WinCE Tutorial - 6 - Running WinCE under Virtual PC - 2
WinCE Tutorial - 5 - Running WinCE under Virtual PC - 1
Running the Image in Virtual PC
You can find the ready Virtual PC image under the VM directory of the packet downloaded from the internet. You can delete the .vfd file if you wish. This file is a floppy image for the bootloader. We will create our own image to see the kernel and driver debug messages using COM port.
Booting the Operating System
Local Install
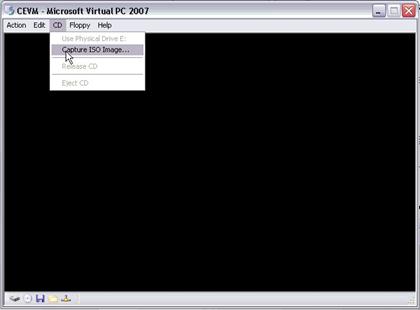
You can follow the local install steps explained for VMware. This time, use your new NK.bin. You can mount an .iso image after running the virtual machine from the CD menu of the virtual machine window.
Remote Download&install Using Serial Connection
This install mode has not been tried yet but following the steps explained for Vmware will be sufficient to download and install the image using serial connection.
Note: Floppy image formats of vmware and virtualbox are different. Vmware can open .img and .flp images and can only create .flp images. Virtual PC can open .vfd, .img, .ima and .dsk images. However, the only difference of .flp and .ima is the file extension. .flp images created by Vmware can be renamed and used with Virtual PC.
Remote Download&install Using Ethernet Connection
We first need to set up a working network between Vmware development image and Virtual PC WinCE image. To keep the physical connections as few as possible, networking can be done using a virtual network adapter.
Steps for setting up a network are as follows:
-
Install Microsoft Loopback Adapter. It is explained here in detail.
-
Associate one of the Vmware networks with the loopback adapter. You can do this using Virtual Network Editor of Vmware.

-
Change the development vm network from the VMware image options to use the network with loopback adapter.

-
Manually configure the network settings of the development image as following:
IP Address: 192.168.1.101
Subnet Mask: 255.255.255.0
Default Gateway: 192.168.1.1 -
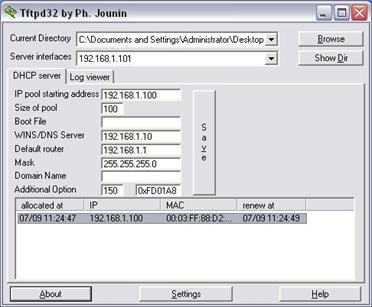
Set up a dhcp server. An example with Tftpd32 will be explained here. After downloading it, copy it to the development vm and start the exe. Configure the program and the server like the following pictures.


IMPORTANT: Using a dhcp server in a company network may cause problems. If you choose using the physical network instead of virtual one, you may need to establish a connection with static ip. It is explained here.
-
Set up the Virtual PC networking. Assign 2 cards (one of the cards will be used for debug communication and the other is for “normal” network). Change both adapters to Microsoft Loopback Adapter.

-
Prepare a new floppy image to boot Virtual PC VM. You can follow the steps written under Serial Connection for Vmware. After creating the floppy image, change the eboot.bin file with the one found under
$(WINCEROOT)\PLATFORM\VirtualPC\BIN\BOOT. After that, unmount it and change the image file extension from .flp to .ima to use it with Virtual PC. -
Start the Virtual PC image and capture the floppy image. If everything runs correctly, you will see the dhcp entry of the Virtual PC ethernet card in Tftpd32.
-
Open development image Visual Studio Connectivity Options. Choose Ethernet from the download and transport combo boxes. Click the settings button next to the download combo box. You will see the Virtual PC image in the Active target devices list. Select the device, apply the changes and return back to the ethernet

-
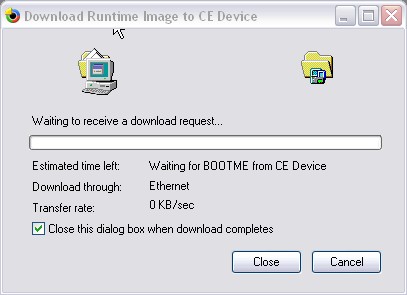
Shut down the WinCE image. Select “Attach Device” option from visual Studio → Target. You will see a window like the following:
-
Start the WinCE image again. After a few seconds, download will be started. After download completes, you will see Windows Embedded CE 6.0 running in Virtual PC.

Connection with a Static IP
It is also possible to connect development and test systems without using a dhcp server. We must only start the ethernet bootloader with a static IP parameter. Boot the Virtaul PC vm with the floppy you created in the previous sections. Choose the clean boot option.
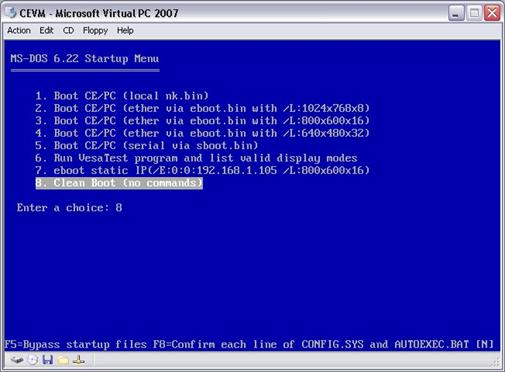
After that, start loadcepc.exe with eboot and give the static ip as a parameter.
Example:
A:\> loadcepc.exe /E:0:0:192.168.1.105 /L:800x600x16 eboot.bin
You can also change the floppy autoexec.bat and config.sys and add the static ip option. Modified files can be downloaded from here.
WinCE Tutorial - 7 - Running WinCE under Virtual PC - 3