WinCE Tutorial - 4 - Running WinCE under VMware - 3
WinCE Tutorial - 3 -Running WinCE under VMware - 2
Debugging
Windows Embedded CE 6.0 has a standard set of debugging features such as breakpoints, step over, step in, etc. Kernel, drivers and applications can be debugged in this fashion. But first, a connection between the platform builder and the target system must be established.
Debugging in WinCE made possible by the Kernel Independent Transport Layer (KITL) functionality. Kernel mode code can only be debugged using KITL. Detailed information about the KITL can be found under this presentation video.
KITL can be used with different physical hardware such as COM, ethernet and usb. However, so called “transport” must be written for the hardware with which we want to connect. This “transport” can be thought of a special driver for KITL. In ethernet case, it is the edbg driver mentioned in the previous section. It is said that writing transport for KITL is easier than writing the original device driver.
In Vmware case, we don’t have any transports which we can use with KITL. Because of that, WinCE image running in Vmware cannot be debugged for the time being.
Note: Hardware used for KITL must be a separate hardware which won’t be used by the WinCE. For example, if a serial port is selected as a KITL transport medium, this port cannot be recognized by WinCE. In ethernet, although it is possible to use the same port for debugging and “normal” networking using vbridge library and vmini virtual adapter, we do not use it for two reasons. The first reason is the speed. These services introduce a new layer, which clearly affects the performance negatively. Secondly, since we will work with ethernet drivers, it is important for us to separate the debug environment with the environment which we are testing.
Detailed information about vbridge and vmini can be found in this address.
Customizing the WinCE image for VMware
The image built in the previous steps runs under VMware. However, some of the hardware won’t be supported. Luckily, support for the most of the VMware hardware can be given by selecting the necessary items from the catalog items view of your solution. Lastly, CEPC BSP should be modified to support the ethernet card.
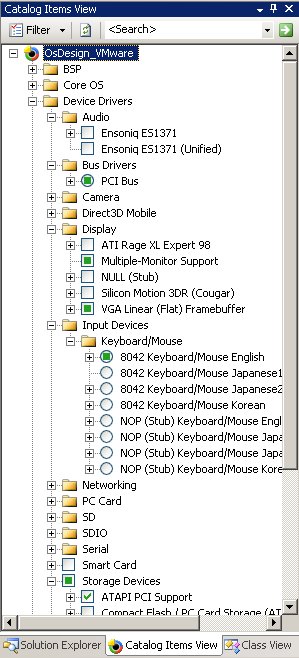
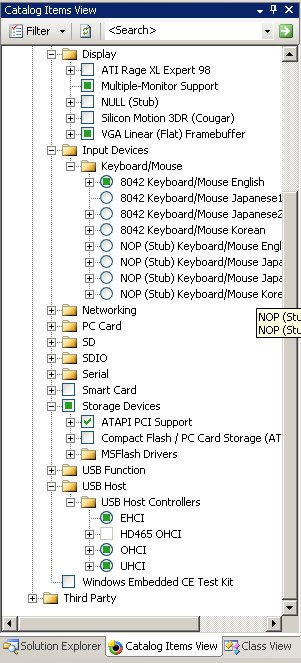
To support monitor, keyboard, hdd and usb, make sure that your catalog items view matches the following two pictures:
To support the audio, select “Ensoniq ES1371 (Unified)”. Finally, to support the CD-Rom, part of the file $(WINCEROOT)\PUBLIC\COMMON\OAK\DRIVERS\BLOCK\ATAPI\atapipcicd.cpp should be commented out. The part to be commented out is given with this file. Changing the file will also affect other CE solutions that you have.
Note that the last two changes are not applied or tested for the time being. That means, the image we are creating will not support sound and cd-rom.
Supporting the ethernet card is a bit more difficult than that. The AMD PCNet virtual card (vlance) is not supported by the Windows CE 6.0 by default. To add the support, ethernet driver for the Windows CE must be made available for the BSP.
To keep the original CEPC BSP untouched, we can first clone it and modify the cloned BSP. This can easily be done from Visual Studio → Tools → Platform Builder for CE 6.0 → Clone BSP option.

After cloning, two catalog files must be changed. These are: $(WINCEROOT)\PLATFORM\<platform_directory>\CATALOG\1033\cepcstrings.pbcxml and $(WINCEROOT)\PLATFORM\<platform_directory>\CATALOG\1041\cepcstrings.pbcxml. Open them with an editor and search for CEPC(case insensitive) and change them with the name you gave for the new BSP.
For ethernet support, copy the pcntn4m.dll and pcnet.reg files into the $(WINCEROOT)\PLATFORM\<platform_directory>\FILES directory. The files can be found in the following zip file.
After that, some modifications must be made in platform.bib and platform.reg files. These files can be found under $(WINCEROOT)\PLATFORM\<platform_directory>\CESYSGEN\files> directory. You can either change the files with the ones given with this file or compare them with the originals and insert the lines which are missing in the originals.
After that, restart the Visual Studio if it is still open and then from the catalog items view, deselect CEPC bsp and select the bsp you created now (can be found under third party). After the rebuild, the image created will support the ethernet, too. You can load the image with one of the methods discussed in the previous sections.
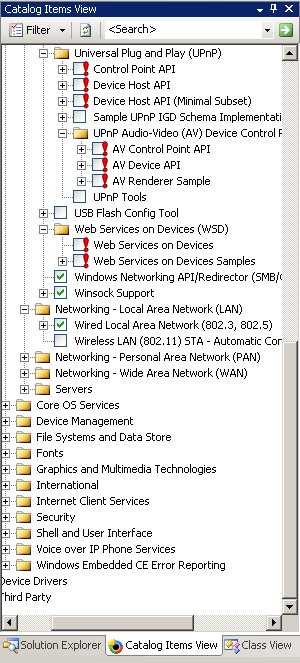
If the VM still does not support ethernet, make sure that you selected the following packages about networking: